Thursday, March 31, 2016

Vapor barrier, slab insulation, and some other stuff

It's been a busy week.  The excavator is gone for now.  The sewer line has been connected, inspected and covered.  Same with the footing drains.  The downspout drains have also been set up.   I didn't get as far with the waterproofing and drainboard as I would have liked but it's close enough for now and I will be able to catch up on that over the weekend.

The excavator compacted the driveway a bit and trenched the water, gas and electric lines.  He installed the water line down to the meter.  The gas and electric are on me.  I'll need to get this done in the next few weeks before we back fill.  It's involves putting some schedule 40 PVC in the trench and getting the utilities to OK it, "shouldn't be a big deal.  Here are some pics of the excavation work.

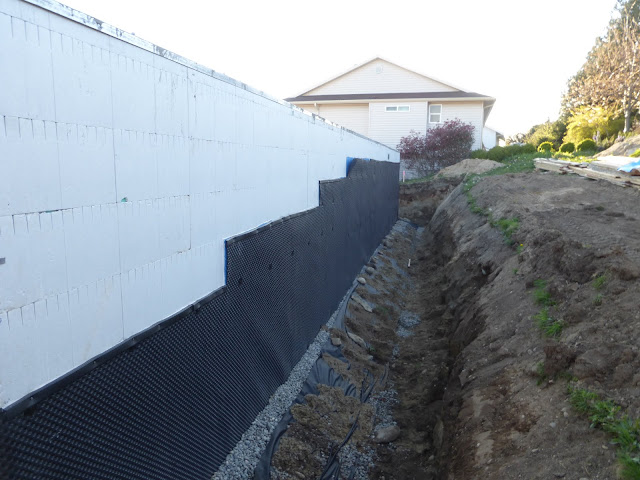
The North wall is almost ready for backfill.  Waterproofed, Drainboard, and footing drains and drain rock are all in place.  The step downs are due to grade and the availability of dirt.  The back deck will extend 18 feet from the corner, or should I say 18 feet to the bottom stair.  With that in mind the plan is to back fill and grade the yard level to that point and then start stepping it down as you see in the pic in order to not have a retaining wall by East side of the lot, not mention the cost of aquiring all the dirt.
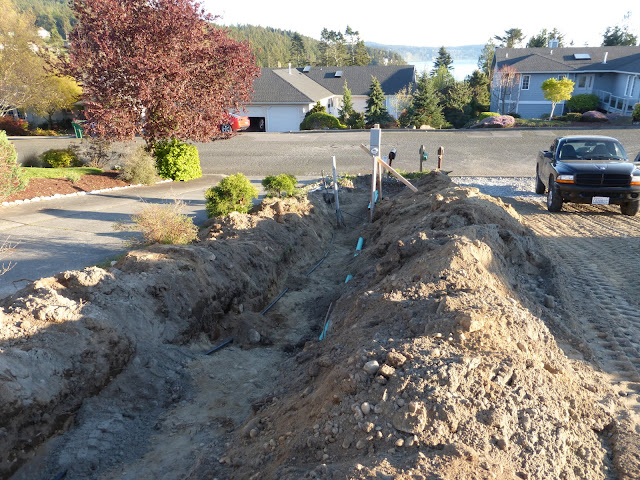
Trench dug to the street.  Green pipe is the storm drain from the footings and downspouts.   This is the trench where gas and electric will go.  You can see the temp meter towards the bottom.  55 feet for the electric run and 65 for the gas.   My truck is making a blog appearance in the driveway.

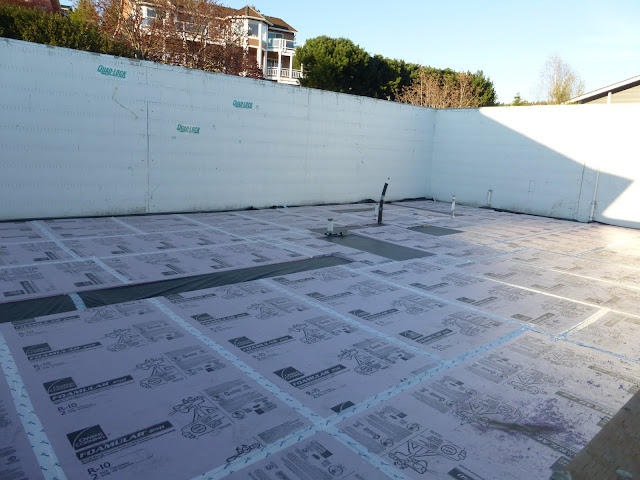
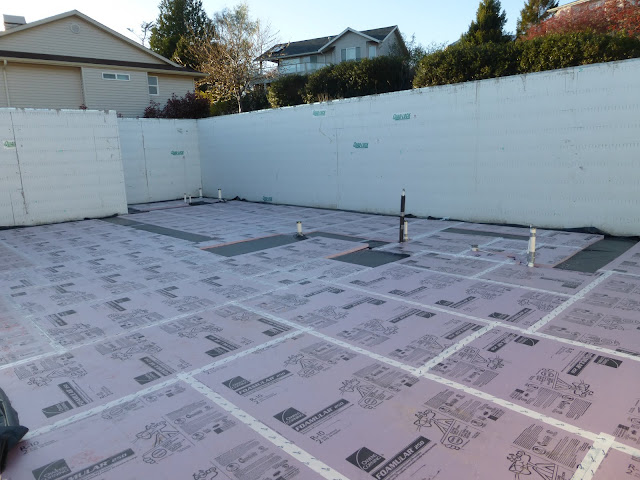
With radiant floor heat being installed it is code to insulate under the slab, and even without in floor heat it is generally a good idea to insulate under the slab if you like a warm basement.   I went with 4 inches of foamular 250 XPS  This provides a R20 insulation rating.  R10 is code, but I went for overachieving.  We also installed a 6 mil vapor barrier underneath the foam.   Tomorrow the HVAC guys will be out to show me how to staple pex to the foam for the radiant heat.  Here are some pics showing the foamboard installed the last two evenings.  It is two layers thick.  I taped it with Tyvek tape, I wanted to use the Owens Corning Joint Seal R or Red sheathing tape, but living in a small town Tyvek was what was available.

I took this by leaning into a window from the outside.   I like how the interior footings show up as black rectangles
Opposite angle 
Next up is to install the manifolds and run the pex for the infloor heat, with the goal of getting the slab poured next week.  I hope everyone is enjoying the process.  I know we are, it's busy, a bit of work and there is always some level of chaos, but so far it's been very rewarding and we feel we have a good handle on things.   Hopefully it stays that way.  Feel free to leave comments or questions on the blog.


Tuesday, March 29, 2016

Waterproofing, Interior backfill, sewer.


After the ICF pour completed last Wednesday the crew came back Thursday to remove the bracing and scaffolding.  I planned to start looking at waterproofing over the weekend, but ended up just doing general site cleanup + dump run on Saturday and then rain ensued until Monday am.

Monday morning  Mike from Catapult Heavy Construction came out and began back filling the interior of the foundation, digging out the sewer and other utilities and installing the storm water and footing drains.

Compacted backfill inside the foundation

Level 

Monday afternoon/evening Janene, and I attached Henry's Blueskin WP 200 peel and stick water proofing membrane to the below grade areas of the foundation.  For those of you who have never handled this stuff.  The Youtube videos are misleading.  It's sticky, fairly heavy and takes a bit of practice.  We did get fairly proficient with it, and I came back the next day and sealed all of the seams. I'm feeling very confident we will have a dry basement.  Where is some wood to knock on?   The next step we started today was to protect this incredible waterproofing membrane from all the rocks during backfill.   To prevent this travesty we installed SuperSeal dimple board.  It's more of a damp proofing product, but will protect against rocks and provide another layer of protection.

Some blueskin waterproofing, plus footing and storm drain, oh and a sewer stub out.
Sewer trench to the street.

Builder utilizing his nephew to help install the drainboard. 
A tape measure?  These guys must be serious


Wednesday, March 23, 2016

Pouring the ICFs

30 days after the first shovel full of dirt was moved we are ready to fill the basement ICFs with concrete.  The pour went pretty smoothly, we did have one wall that started to bow a bit and there was some scrambling to get the bracing improved.  Overall it was a successful pour.  Here are some pics.


Huge Concrete pump truck

Ready to be filled

Starting to fill
Full to the top

Tuesday, March 22, 2016

Under slab plumbing

A flurry of activity at the site today.   The ICF crew wrapped up the forms and passed inspection.  Concrete will be poured tomorrow.  In the afternoon The Plumbing Guys showed up and started putting in all of the plumbing that will reside underneath the basement slab.

Here are a few pics.  Tomorrow I'll post some of the concrete pour.

Ready for cement
Main line traversing the basement
Downstairs bathroom rough in
Water line

Saturday, March 19, 2016

Last ICF update before the pour

A productive week.  The ICF construction phase is almost complete.   We ran into a slight snag yesterday where we ran out of the green ties that hold the ICF panels together.  Unfortunately the building supply store doesn't stock them, but they were able to arrange for me to pick them up from Quadlock.   In Surrey BC.  About a 75 minute drive + the fun of border crossing, but it beat waiting until next Thursday for them to be shipped across the border.

The ICF build out should complete on Monday, there is just a little work left along the top row and then complete the garage buck outs.  If no other issues pop up we should be ready for inspection on Tuesday and hopefully pouring the cement on Wednesday.   The next set of pictures will have a cement truck in them.

Almost there. Back wall is complete.  A few rows left on the front and putting in the garage door buck outs and it will be ready.

back wall. 55 feet long and 9 feet 4 inches high.  Ready for concrete

West wall.  Bracing in place and one of the window buckouts.
Looking up for the street

Wednesday, March 16, 2016

ICFs brack at it.

After a few days off the corner brackets from Quadlock arrived and work has resumed.

I'll only post a couple as I think we've seen enough pictures of the white legos.   Weather forecast looks decent, hopefully we are filling these with cement next week.

The top left corner only needs to be one row higher
Starting to have to work from ladders


Monday, March 14, 2016

What we are building

With a few days of down time waiting for the corner brackets.  I thought I'd make a post that shows what we are building.  This is just the designers rendition on the plans.  The paint colors will be different and I'm pretty confident that the sidewalk to the front door will get some modifications.

Add caption
Here is what the lower level floor plan will look like.


Upper level. 


Here is a typical wall section.


Friday, March 11, 2016

ICF delays

Ran into a roadblock yesterday.  The crew ran out of the outside corner brackets, and the supplier didn't have them on the takeoff for the ICFs, thus they had to order them and it will be a few days before construction can resume.  I think delays are an inevitable part of construction, even ones like this that seem like they should have been avoidable.

One item I failed to mention in the first ICF post is that the ties joining the panels together contain channels.  These channels are for rebar, each row will get rebar, alternating between an outside channel and an inside channel each row.  The reason for alternating is that when you get to the top and put in the vertical rebar it can be slid down between the alternating horizontal rebar and this will prevent the vertical bars from being pushed to the outside.

Here are a few pics of where we are at.  About 1/3 of the way up.

West wall
North wall
Starting to look like a house
Southwest corner

Tuesday, March 8, 2016

Week 3: ICF basement begins

Today the construction of the daylight basement walls began.  The South (front ) of the house will be at grade level with a drive in two car garage and the rest of the basement will contain 2 bedrooms a bathroom and a bonus room.   For the foundation walls we opted to use ICFs ( Insulated Concrete Forms ).  We choose to use this construction method for the entire basement level.

There are many advantages to using ICFs.   The construction process is faster, as forms do not need to be removed after the foundation is poured.  For the interior of the basement it is not necessary to fur in the wall, and insulate to create a livable space.  After the ICF wall is constructed, drywall may be attached directly to the ICF wall.  Electrical and Plumbing chases can be cut into the ICF wall with a variety of methods.  All of these things save time in the construction process.

We are going with a 14 inch wall and using Quadlock ICFs.  The concrete cavity is 8 inches and each foam panel is 3 inches thick, 12 inches high and 4 feet long.   A metal guide is nailed into the footing and the first row of foam board is attached to the channel using spray foam.   The panels are joined to each other using plastic ties placed into pre cut openings in the panels.  These plastic ties are strong enough to be anchors for drywall and siding.  The tops of the panels look like legos and each subsequent row is placed on top just like building a lego house as a kid.   The plastic ties have channels cut into them specifically for the purpose of holding rebar to strengthen the foundation walls.

Ended up getting rained out on Monday.  The materials were delivered and some work done, but the rain won.   Here are some pictures from Tuesday.


Northwall
First row of ICFs.  Northwest Corner.


More ICFs


Starting to look like a wall

ICFs with ties attached
Had to extend the footing a bit due to a slight miscalculation

Thursday, March 3, 2016

Footings are done

Things are coming along.  Yesterday the footings inspection passed, and this morning a cement truck showed up to pour.  I missed being there to get pics of cement coming out of the truck, but I'm pretty sure I know what that looks like.    The wind continues to be a battle, but for now we seem to be winning, or at least in a tie.

The Quadlock ICFs are being delivered on Monday.  Will probably take a day or two to get the first row, but if the weather cooperates this might start looking a bit like a building this time next week.

Here are the latest pics.


North wall footings waiting for cement


setting rebar by the west side step down.


A nice day for some concrete


More pictures of cement